How to install your Music Controller and make it work properly
There are 2 types of Music Controllers. The Music Controller 1 comes with an IR24 remote, while the Music Controller 2 comes with a RF Touch Remote.
The IR24 remote with the Music Controller 1.
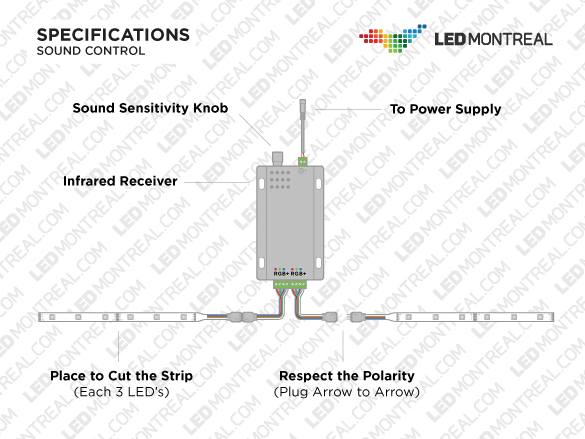
When installing your Music controller, keep in mind that the included IR24 remote works with infra-red signal, which essentially means that you have to point at the receptor with the remote for it to work. This means that the receptor part of the controller has to be exposed. The receptor is located inside the controller, under the holes on top, near the sensitivity regulation knob.
YOUR CIRCUIT.
The Music Controllers offer two RGB+ outputs, which allow you to split your circuit. It’s useful when going over 10m of RGB 150 LED Strip or over 5m of RGB 300 LED Strip.
- • For RGB 150 Strips: You can put up to 10m of strip on one of the 2 outputs, which means that if you have between 10m and 20m, you have to use both outputs and split the circuit as evenly as possible.
- • For RGB 300 Strips: You can put up to 5m of strip on one of the 2 outputs, which means that if you have between 5m and 10m, you have to use both outputs and split the circuit as evenly as possible.
Connecting the RGB LED strips, the music controller and the power supply.
- First things first, identify the RGB+ clamp modules (small green boxes) on the controller where you’ll have to insert the RGB wires. Unscrew the RGB+ clamps you chose to use.
- Properly skin the RGB wires of the connector to expose the metal and give enough room to clamp on. Insert the skinned part of the RGB wires into the holes of the clamps and then screw to attach properly.
- Please note that the red wire goes into R, the green wire goes into G, the blue wire goes into B and the white (or sometimes black) wire goes into +.
- When you plug in your RGB connector to your strip, make sure that the colors of the wires match.
- Once the RGB wires are properly installed, you can set up the power part of the controller. Insert the male end of the power supply cable into the female DC adaptor. Then, insert the 2 wires of the adaptor into the DC input clamps of the controller. Make sure those wires are properly skinned and that you put the Red wire into +.

Sound mode on the Music Controller 2.
Please note that when in sound control mode, the color selection mode is not available. If you are trying to select a specific color, you have to return to normal mode first.
YOU HAVE FURTHER QUESTIONS? GIVE US A CALL!
Montréal: 514-225-3777
Sans frais: 1-855-533-4685
